


- Video
-
Club Roar
Captured a great grassroots sporting moment? We want to see it!Content Collections
The Roar Community
- Join
- Login
‘It is only natural for the eye to follow the ball. Most misjudgements in rugby come from that fact’. That phrase is a perfect précis of what all the top defensive minds have told me over the past 25 years.
Whether it be Phil Larder for England circa 2003, or Clive Griffiths for Wales in 2005, or Stuart Lancaster for Leinster over the past seven years; or Andy Farrell for England and the British & Irish Lions for the last ten seasons, they will all tell the same tale.
The eye of the casual observer is inevitably drawn to what happens in and around the ball, but the best defence coaches are just as concerned by what happens away from it.
How quickly does it take defenders to reload into position? How long can the defensive structure maintain its shape under pressure? Which individuals are best able to support that structure by their work rate and sheer number of involvements?
Those are just a sample of some of the questions which tease and torment the best defensive intellects in the game, and which need the benefit of the Eagle’s Eye to determine the truth.
It will probably be with secret sigh of relief that Australian head coach Dave Rennie has digested the recent news that Michael Hooper is likely to make himself available for the end-of-year tour to Europe.
With the two current top-ranked nations in the world, France and Ireland both on the Wallaby menu, Australia needs every seasoned hand on deck to prevent rugby humiliation occurring twice in the space of three weeks.
Despite the Wallabies shipping ten tries and 79 points over two matches against an unsteady All Blacks outfit, the new Hooper-less ‘big back row’ has received the stamp of approval from two very prominent ex-Wallabies, and their welcome for the ex-skipper’s return has been lukewarm.
The Roar’s own Will Genia commented: “There are going to be questions around whether ‘Hoops’ does come straight back in because of how good Pete [Samu] has been, but more so because of how good the balance of the back row is with him at number seven.
“I think size matters more than ever at Test level. You need those big bodies to be able to win the collisions and then give you the opportunity to play off the front foot.
If I’m picking a team that’s going straight into the Spring Tour, now I’m thinking ‘Pete Samu at number 7’.
Will got further support from Tim Horan on the telly:
“I reckon we’ve got the back row right now – big size, big bodies. I wouldn’t be surprised if – Hoops, actually, if he does go on tour – if he captains from the bench potentially…
“Hopefully, for Michael Hooper to be in a good space, he wants to be playing rugby again. If that’s the case, he might play a couple of Test matches, but I’d like to see him come off the bench for the first couple and still have a big back row.”
Pete Samu. (Photo by Mark Metcalfe/Getty Images)
The casual observer would be fully entitled to question why Michael Hooper’s star appears to have fallen on the back of two Wallaby defeats to the old enemy, the second of which was conclusive enough to deserve the word ‘rout’.
After all, the big hole at number 6 has hardly been filled to anyone’s satisfaction this season, with neither Rob Leota, Jed Holloway nor Harry Wilson nailing down the spot.
After all, Hooper had been one of the standout players in the 2021 Rugby Championship, with most of his salient stats produced in exactly the place where they were needed, on defence. Even a brief glimpse reveals a number 7 who was:
If Pete Samu really improves the balance of the Australian back row, we should be able to see it somewhere in the stats comparing the performance of Hooper, Fraser McReight and ‘Pistol Pete’ as starting Wallaby number 7’s over the past two seasons, right?
| Player | Minutes played | Metres run | Decisive outcomes | Tackles made | Breakdown steals/spoils | Ruck attendance [attack/Defence] |
| Hooper [2021 RC) | 470 | 37-242 | 12 | 59/64 | 3/11 | 114/52 |
| McReight [2022 1-4] | 267 | 21-95 | 6 | 35/39 | 2/5 | 67/30 |
| Samu [2022 5-6] | 160 | 16-116 | 10 | 18/23 | 2/1 | 28/12 |
We know that Samu is a world-class attacker in the wide channels, and the proportion of the decisive outcomes he generates with ball in hand – one every 16 minutes, compared to one every 39 minutes by Hooper and one every 44 minutes by McReight – reinforces that message.
Rather than dwelling on the obvious, let’s take the attitude of a top defensive coach and look at his contributions without the ball:
| Player | Tackle interval [mins] | Tackle completion % | On-ball steal/spoil interval | Defensive ruck attendance interval |
| Hooper | 7.9’ | 92% | 33’ | 9.0’ |
| McReight | 7.6’ | 90% | 38’ | 8.9’ |
| Samu | 8.9’ | 78% | 53’ | 13.3’ |
The stats of Hooper and McReight are remarkably similar, and Pete Samu struggles to match the frequency with which the other two complete tackles and make on-ball disruptions or pilfers. He doesn’t get involved in the same volume of rucks and the ratio of successful tackles is well down on that of his rivals.
But surely, given the support the big back row has received, you would think Samu really imposes his physicality on the ball-carrier? In fact, it was very hard to find evidence for that theory in the final round game between the Wallabies and All Blacks at Eden Park.
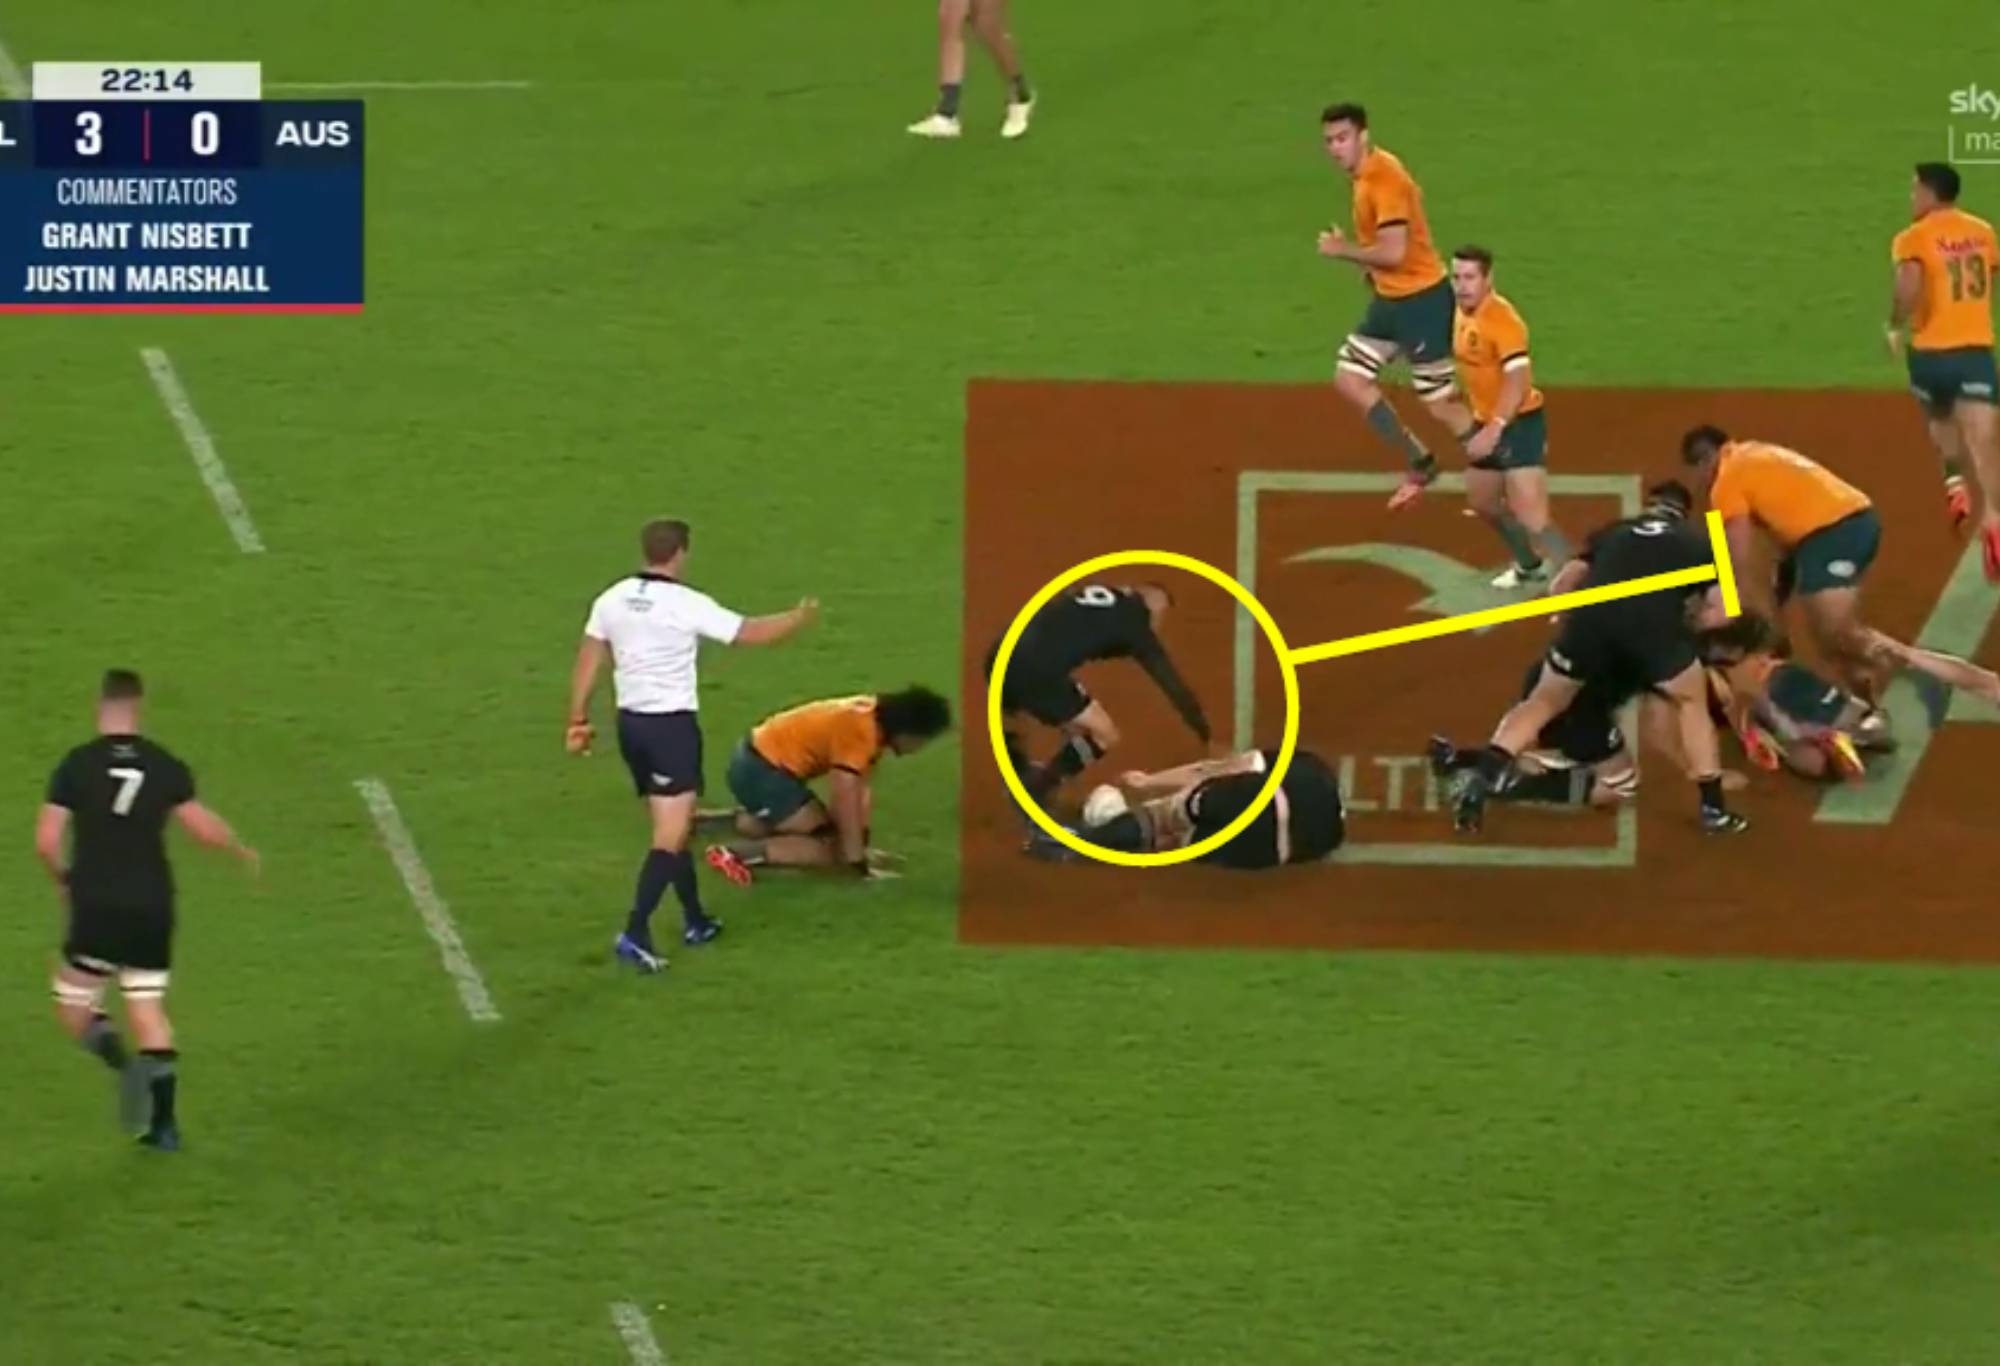
Here is Pete Samu tackling a forward, second row Brodie Retallick:
It is a passive, ankle-level tackle which allows ‘the Guzzler’ to ride over the top and claim an extra couple of metres on the carry. That allows his mate, Sam Whitelock, to bully Rob Valetini out of any notion he might have of making a contest of it and create a very deep ruck with no pressure on Aaron Smith at all:
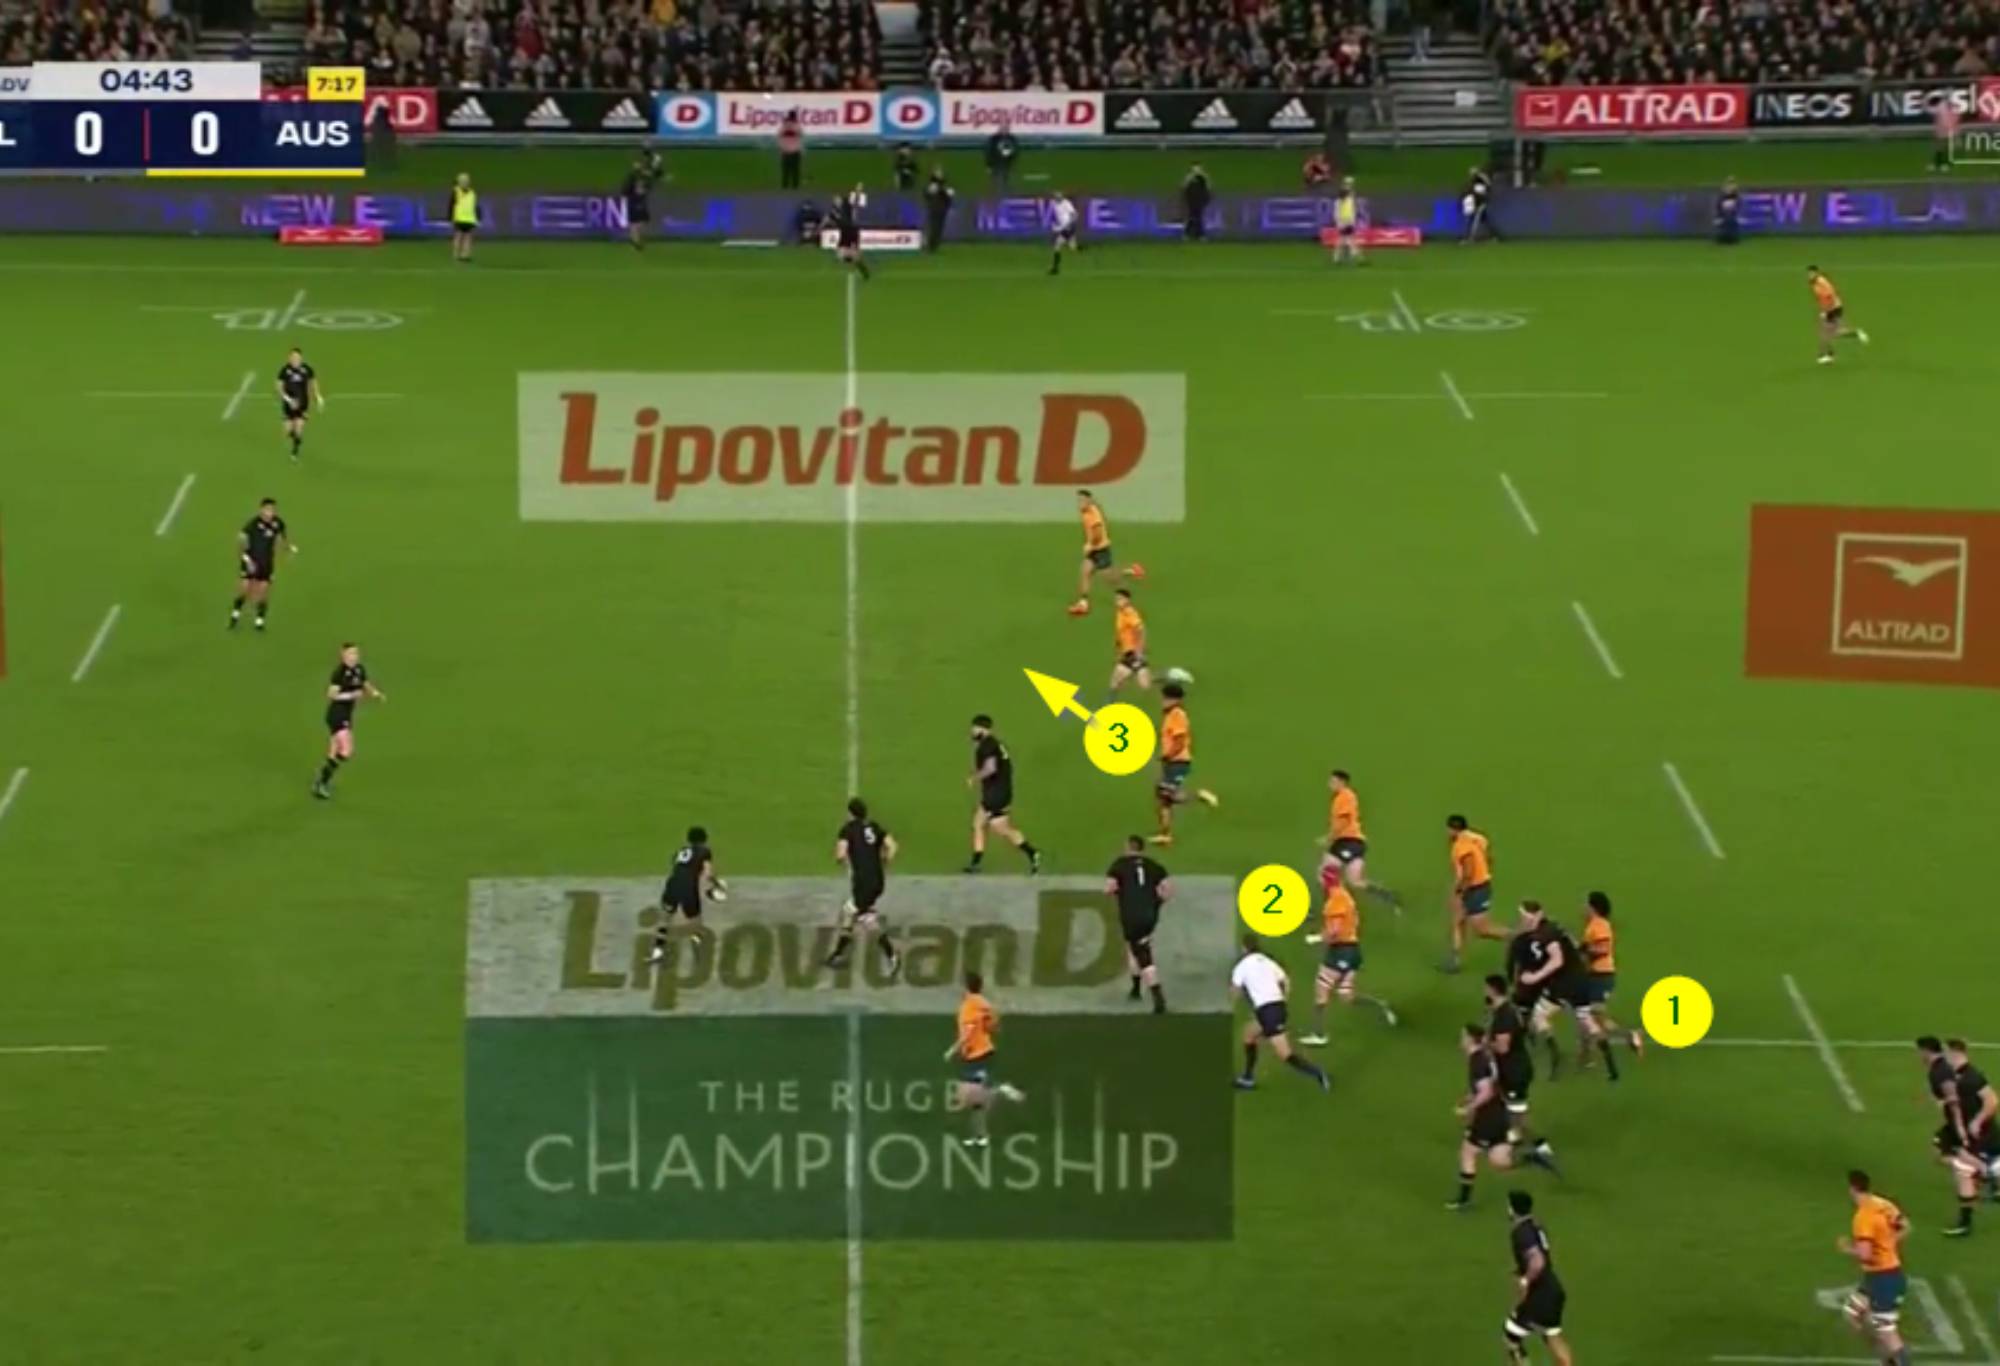
No pressure on ‘Nugget’ means trouble for the defence, and the Wallaby defenders all have to run the long way around to reach their posts. On the following play, the All Blacks gain easy access to the outside of the field with a chain of simple passes.
Now here is Samu tackling a back, second five-eighth Jordie Barrett:
Barrett runs straight through the tackle attempt without a moment’s distraction and careers on into the Wallaby backfield.
One of the problems associated with passive collisions is that it persuaded the Wallabies to do more of what they were doing in Melbourne – over-competing at the following tackle and giving up even more territory through penalties:
In the first instance, Samu gets bumped off by Tyrel Lomax, then the Wallabies over-compensate by conceding a double penalty on the next phase – both offside and collapsing over the ruck ball on the ground. It was the second such offence that Pistol Pete conceded in the game.
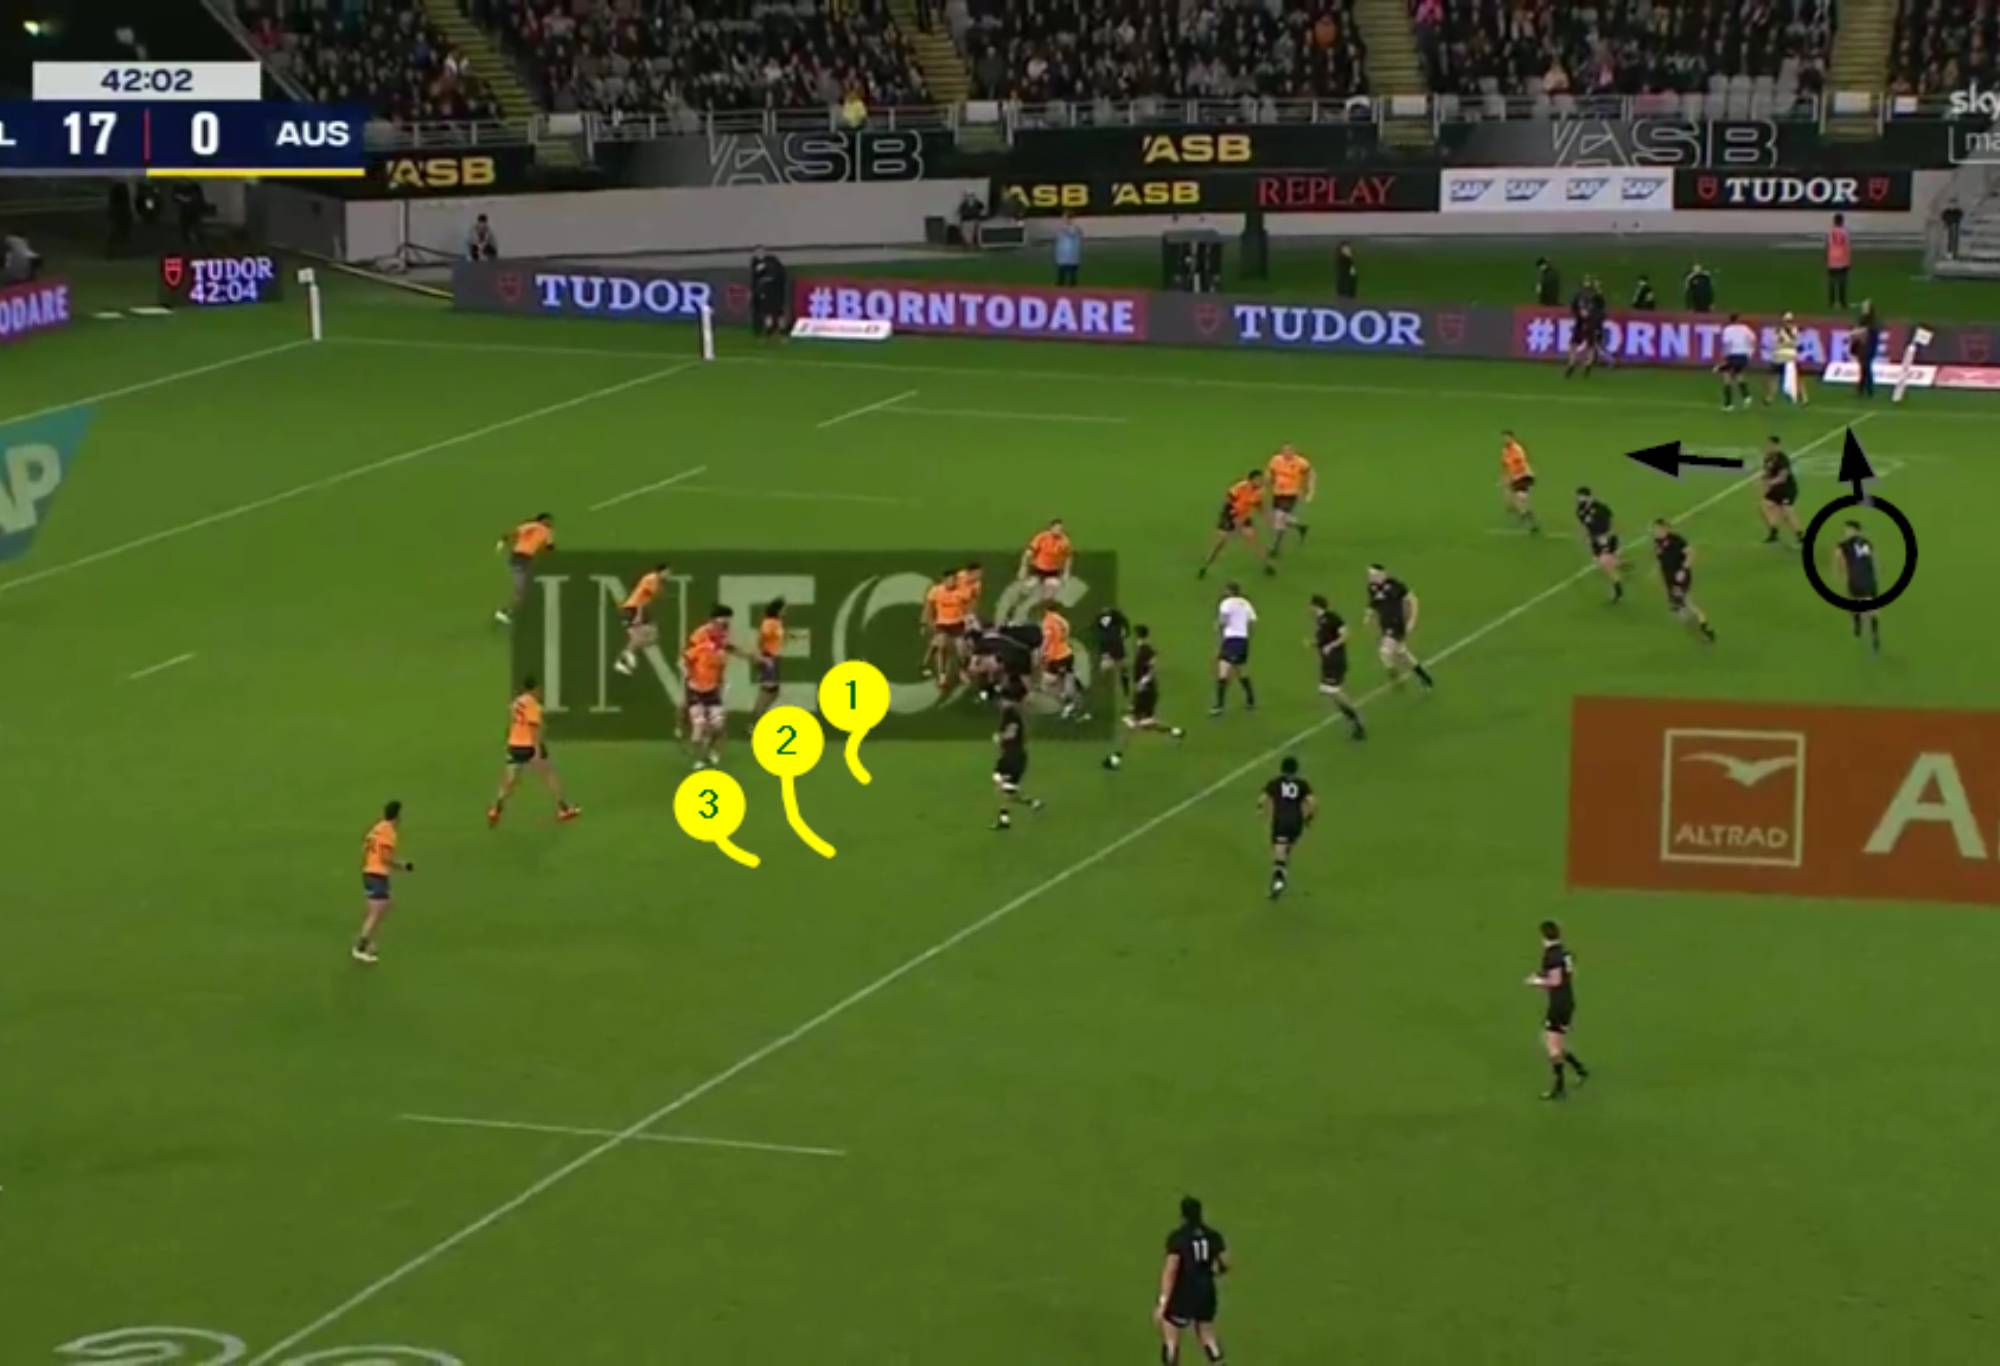
The other major issue with the big back row was that it very rarely positioned Samu where he should have been – linking the forward defence to the first back and covering the width of the field in the time-honoured manner of the finest 7’s in the game. Too often for comfort, that duty was left to Valetini or Harry Wilson:
Samu misses another low tackle, this time on Ardie Savea, and that creates the initial break. It also paints the defensive picture which the Wallabies can least afford to see on the next play:
The widest back-row defender is Valetini not Samu, and Bobby runs straight forwards while the backs next to him run sideway towards touch. Another disconnect, another big break for the All Blacks:
That same picture was repeated many times over:
Samu misses Barrett again, and Kiwi pivot Richie Mo’unga is able to outwit the combination of Wilson and Tom Wright on the wide left.
A very similar situation accounted for New Zealand’s first try of the game:
Samu is standing idle near the ruck, leaving Harry Wilson to try and link with his backs further out. The big Queenslander is taken out all too easily by a simple decoy and Jordan Petaia is left high and dry on his own in defence:

It is symbolic. The All Blacks are dominating all of the support channels and all of the four Australians in cover – Valetini, Wilson, Samu and Jed Holloway – have played back row for their country in 2022. None of them are going to reach the critical defensive space in time, and it is just the sort of area that Michael Hooper – and for that matter, Fraser McReight – are so expert at filling.
The same theme, repeated regularly enough, gave the All Blacks attacking opportunities they did not really have to work for:
When Tom Wright takes the ill-advised tapped penalty, Samu is idle and looking the other way behind him. What persuades Mo’unga to run rather than to kick for touch? The sight of Valetini, exposed on the edge of the field!
Defensively, the Australian back row was a shambles from beginning to end at Eden Park – for the simple reason that none of the players in it have the instincts of a natural number 7, or anything remotely resembling them:
All three of Samu, Wilson and Valetini gallop around the corner of the first ruck, which means there are only tight forwards left to defend Codie Taylor and Will Jordan when the ball come back to the short-side on the second phase. Whitelock dotted down a contentious score shortly afterwards, but the game was long gone for Australia by that stage.
Summary
A number of respected ex-Wallabies have come out strongly in support of the big back row after Australia’s second successive defeat to the All Blacks at Eden Park. Not a few Hooper-haters have followed in the wake of their comments.
While it is easy to see what Samu offers on attack – and that includes some bonuses in the wide channels that any other nation in the world would struggle to match – when the observational eye stops following the ball and looks for contributions on defence, the story is very different.
Pistol Pete does not play like a man with the instincts of natural No.7 seven. He defends close to the ruck but his on-ball attempts are few and far between, and he is a long, long way from being the surest tackler on the team. A machine he is emphatically not.
The companion problem is that Australia has yet to settle on a No.6 who can do the job, so they got the worst of all possible worlds in defence on both sides of the scrum at Eden Park. There simply isn’t a Marcos Kremer around to contribute 135 ruck arrivals, 80 tackles, four dominant hits and three breakdown pilfers from the blind-side of the set-piece.
In the circumstances, Dave Rennie should be welcoming back Hooper to his starting XV with open arms for the Spring tour. Samu looked completely exhausted well before the end of the game in Auckland, and he does not have Hooper’s 80-minute engine. He won’t give the Wallabies the dynamic hits and double involvements, the continual on-ball nuisance and the ever-presence at cleanout time. He won’t be the one putting out the fires when the Wallaby line is broken either.
Make no mistake, Samu can play a role – maybe an important one – for the Wallabies at the 2023 World Cup. But not from number 7, and certainly not while number 6 remains up in the air. Forget the big back row, and pick the man who has been there, and already done it.