


- Video
-
Club Roar
Captured a great grassroots sporting moment? We want to see it!Content Collections
The Roar Community
- Join
- Login

The Wallabies clearly had a plan they had worked on for their kickoffs going into the match against the Springboks last weekend but the plan backfired on them.
Despite this the Wallabies persisted with the same plan for all five kickoffs in the first half.
In the second half the Wallabies changed the plan and directed both of their kickoffs to different positions from that which they’d used in the first half and they regained possession from one of those kicks.
How the teams setup
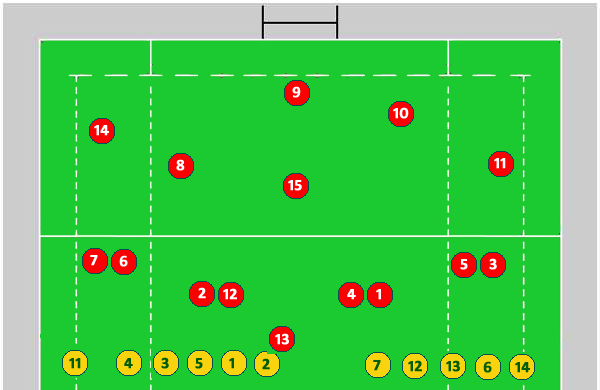
The Springboks set up to receive kickoffs in a split structure with their two locks on their left side of the field being lifted by one prop each.
On the other side of the field they have their two flankers working together as a pod with a single lifter and their hooker working with their number twelve doing the same so that they have two jumping units on each side of the field as shown in the diagram below.
The rest of their structure is pretty standard.
The Wallabies lined up with most of their fastest chasers on the right side of the field (including their best jumper in Adam Ashley-Cooper) so were clearly looking to apply pressure on that side of the field.
This meant that the Wallabies tight five had to defend the left side of the field.
Nic White trailed in behind the line as cover leaving Israel Folau, Quade Cooper and Ben Mowen in the backfield to receive any return kick.
If the Springboks didn’t kick on first phase Mowen would move up into the line on the left side.
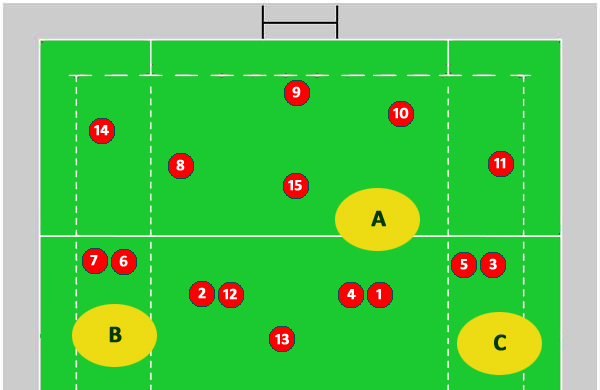
Looking at that setup from the Springboks the first areas to target would be where space exists on the field.
There are three main possibilities I’d consider as shown in the diagram below:
Zone A just inside the 22 behind the two locks on the right side but with Bryan Habana in that general area he would probably cover that quite easily.
Zone B short and left with a low trajectory kick giving Joe Tomane something to chase.
Zone C short and right with the same type of kick giving Ashley-Cooper the opportunity.
Why target the zone the Wallabies did?
I’d have aimed at Zone C with Ashley-Cooper being so good in the air. However the Wallabies had something else in mind and instead targeted the 5/3 pod just outside the Springboks 22 with Jannie du Plessis lifting Flip van de Merwe.
I suspect that this target area was chosen for some or all of the following reasons:
1. A high kick landing just outside the 22 would still give the chasers time to get in position to contest the ball;
2. Van de Merwe is a heavy man who du Plessis would struggle to lift very high using a single lift. With Ashley-Cooper leading the charge he would be a good chance to get up higher than van de Merwe;
3. If the Wallabies could regain possession they would start in good field position just outside the Springbok 22;
4. If the Springboks got possession they would be starting outside their 22 so would not be able to kick the ball directly into touch;
5. The Springboks are seen as a team that primarily kicks the ball out of their own territory and starting near their 22 they tend to clear the ball whereas if they received possession further up field they may choose to run the ball;
6. Without being able to kick the ball out on the full the Springboks would have to kick the ball back to the Wallabies which may open up counter attacking opportunities;
7. The Wallabies positioned Michael Hooper and Christian Lealiifano on the left edge of the contest and I expect they were designated as the main chasers when Morne Steyn cleared the ball;
8. The Springboks clearing options on that side of the field would all be right footed so with Hooper and Lealiifano angling back in at the kicker they may be a chance to pressure the kicker to pull the ball into touch giving the Wallabies a lineout in good field position from where the kick was made.
That sort of setup would have looked something like that shown in the diagram below.

That plan looks reasonable on paper. However, using it would rely on the Springboks following past patterns and looking to clear the ball from their own territory.
Springboks reacted too quickly for the Wallabies
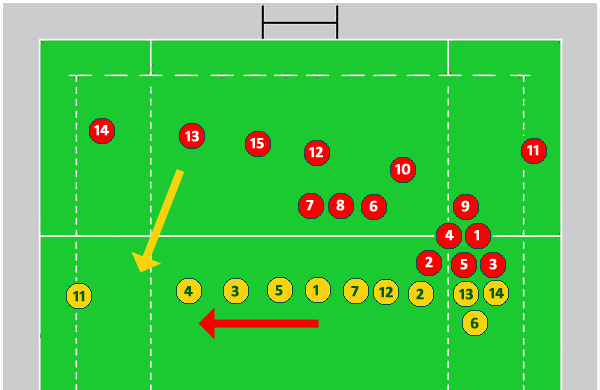
The Springboks quickly reacted to the way the Wallabies were defending the kickoffs.
Instead of Zane Kirchner dropping in behind Steyn as a backup kicker he joined the backline and Steyn moved the ball wide before the Wallabies reset their defensive pattern as shown in the diagram below.
Whilst the Springboks reacted quickly and used this tactic from three of the five kickoffs in the first half, the Wallabies were slow to react.
This gave the Springboks a speed and mobility advantage against the Wallabies left side defence with backs running against forwards and the Wallabies scrambling across field to try and catch up as shown below.
Of course one of these kickoff returns produced Kirchner’s try.
The Springboks exploited this weakness from the first kickoff by the Wallabies yet the Wallabies persisted with the same plan for all five kickoffs in the first half.
I can’t understand why you’d keep going with a plan over and over when it wasn’t working, particularly after the Kirchner try.
Regardless of whether the kickoff plan the Wallabies took into this match had merit or not, once it proved a liability the players on field should have been able to change the structure and kick elsewhere rather than wait until halftime to make the change.
Then again, they should have been able to change the kick on all occasions game plan too!