


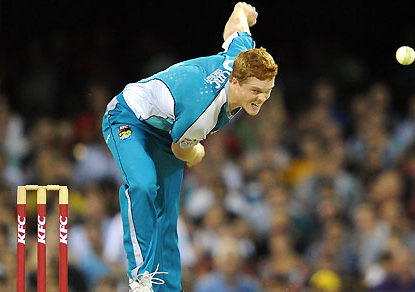
Big Bash League: Brisbane Heat vs Perth Scorchers preview, analysis
Of all the opening round fixtures in the Big Bash League this year, the rematch of last year’s Grand Final between the Brisbane Heat…

Roar Guru
Joined February 2012
438k
Views
124
Published
1.2k
Comments
Dan Talintyre is a former freelance sports journalist with vast experience working for a number of companies and websites. He also worked for Squawka and Bleacher Report, had content published on Sky Sports, Yahoo! Sports, PGA.com, The Guardian, The Age, teamTALK, The Examiner and others, and provided live scoring and commentary for Cricket Australia, Tennis Australia, Wide World of Sports, BigBash.com.au, Ninemsn, ABC Grandstand and more. He now works full-time as the Head of Media and Digital with Wests Tigers.
Published
Comments
Of all the opening round fixtures in the Big Bash League this year, the rematch of last year’s Grand Final between the Brisbane Heat…
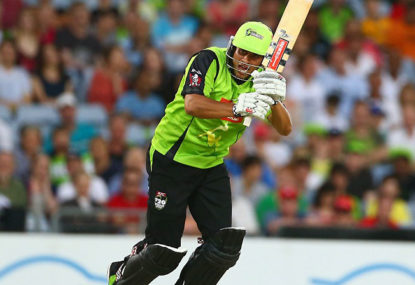
The second 2013/14 Big Bash League match kicks off in Sydney with a huge derby. And intriguingly, it's the Sydney Sixers that have dominated…
The Melbourne derby is seemingly the perfect way to kick off the 2013 Big Bash League in Victoria this year, with an abundance of…

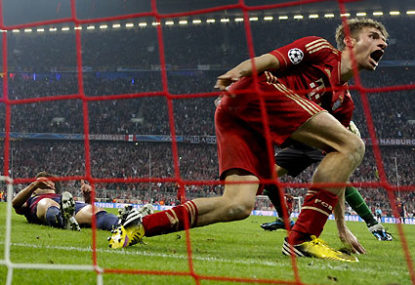
With the 32 teams in the running for the 2013/14 UEFA Champions League whittled down to just 16 teams last week, the draw has…

Having played their final group-stage matches this morning, just half of the 32 teams in the hunt for the 2013/14 UEFA Champions League title…
Mickey Arthur's comments made to the ABC haven't been well-scrutinised, until Peter FitzSimons' column today. And what extraordinary comments they are. The interview that…

Australia have been drawn alongside defending champions Spain, as well as the Netherlands and Chile in Group B for the 2014 FIFA World Cup…

Australia: welcome to the Group of Death, drawn alongside defending champions Spain, 2010 runners-up in the Netherlands as well as South American powerhouse Chile.…

After what has seemingly been a long and arduous process, the draw for the 2014 FIFA World Cup is finally upon us. Join us…

I've never met Matt Cowdrey. I've never spoken to him on the phone; never received an email from him. I've never even seen him…

If there were any doubts about the best team in international rugby heading into the start of the 2013, they've all been dispelled by…

James Anderson walked to the crease knowing the Test match was over. Not even the greatest rain dance of all time was going to…

For years, football fans in Australia have been forced to "defend" their sport. They've been forced to defend it from the fans that simply…

The 2013 MotoGP season will come down to the final event this year, with the Valencia Grand Prix scheduled for this weekend set to…

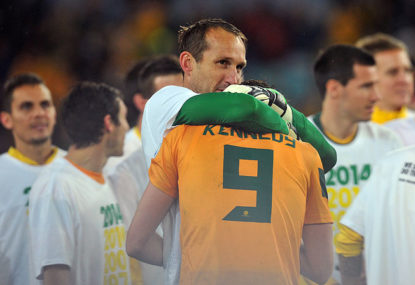
Just hours before new coach Ange Postecoglou was set to name his first Socceroos squad, veteran goalkeeper Mark Schwarzer has reportedly announced his retirement…
Melbourne Victory will begin life without Ange Postecoglou when they take on the Wellington Phoenix in a rare Monday night game at the Etihad…

The 2014 NRL Auckland Nines might still be over three months away from actually taking place, but already, the hype and anticipation surrounding the…
Ange Postecoglou will lead the Socceroos to the 2014 World Cup in Brazil next year after being named as the new head coach of…

The 2013-14 UEFA Champions League returns this week with a number of intriguing fixtures scheduled to take place involving some of the biggest teams…

Perth Glory will look to get their season back on track this weekend when they take on a winless Newcastle Jets outfit at Hunter…

55’—Long ball for Barbarouses, held, Thompson scores, but offside!!!
ALMOST ANOTHER GOAL FOR THE HOME TEAM THERE!
Barbarouses played in behind the defense with a great long-ball, held a little by the Phoenix defenders inside the box—crowd wants a penalty but none forthcoming. Barbarouses plays out to Troisi, quickly back inside the box to Thompson who puts the ball in the back of the net but he’s offside! How did the Victory not score there!
56’ The net bulges again, but offside called against Archie Thompson. Narrowest of margins #MVCvWEL 3-1
— Melbourne Victory (@gomvfc) November 4, 2013
56': Archie Thompson's offside woes continue. #MVCvWEL pic.twitter.com/yQ01fbBe2X
— FOX SPORTS Football (@FOXFootballLive) November 4, 2013
Bad foul on Muscat as the Phoenix clear sees him go into the referees’ book with a yellow.
Melbourne Victory vs Wellington Phoenix: A-League live scores, blog
53’—Victory with possession, Phoenix win free-kick inside own half.
Good run from the back, Barbarouses tries to win a corner again for the Victory, but this time Wellington clear. It’s been all in Wellington’s half so far, but a free-kick helps them clear eventually.
Melbourne Victory vs Wellington Phoenix: A-League live scores, blog
51’—Another corner for Melbourne, headed over the bar from Milligan!!
Huge chance again—Phoenix somehow hanging on at the moment!
Melbourne Victory vs Wellington Phoenix: A-League live scores, blog
49′—Header saved off the line!! Phoenix clear somehow!
Three corners in a row for Melbourne and they almost get reward on all three! Saved off the line very well from Moss, and the Phoenix quickly heave it out of their own end! It’s been all Melbourne so far.
Melbourne Victory vs Wellington Phoenix: A-League live scores, blog
20K? I’ll get back to you.
Melbourne Victory vs Wellington Phoenix: A-League live scores, blog
48’—Wellington looking to break from the back, turned over, corner.
Phoenix turn over to Thompson again, who wins a corner for the Victory. Phoenix’s back-line was playing much deeper there than it was in the first half, most likely some words from the coach at HT.
Corner is cleared out for a corner on the other side.
Melbourne Victory vs Wellington Phoenix: A-League live scores, blog
45’—Second half is now underway! Victory lead 3-1, with possession.
Melbourne win a corner pretty much off the restart, and it’s cleared off the line by Fenton!
Danger signs already!
Melbourne Victory vs Wellington Phoenix: A-League live scores, blog
HALF-TIME —— MELBOURNE VICTORY 3-1 WELLINGTON PHOENIX
Melbourne Victory—Thompson (‘9), Troisi (23′, 32’)
Wellington Phoenix—Brockie (’38)
Since the start of 2012-13 season, Jeremy Brockie has scored 18 of Wellington's 34 goals (53%) – highest percentage of any A-League player
— Fox Sports Stats (@foxsportsstats) November 4, 2013
HALF-TIME STATISTICS
Possession
Victory (55%) lead Phoenix (45%)
Shots on Target
Victory (5) lead Phoenix (1)
Fouls Conceded
Phoenix (10) lead Victory (5)
Saves
Phoenix (3) lead Victory (1)
Melbourne Victory vs Wellington Phoenix: A-League live scores, blog
HALF-TIME —— MELBOURNE VICTORY 3-1 WELLINGTON PHOENIX
Stunning first half of football; four goals and there could have been more!
Half-time stats to come. What have you made of the opening 45 minutes?
Melbourne Victory vs Wellington Phoenix: A-League live scores, blog
45’—VICTORY CONTROLLING ACROSS THE BACK
Victory controlling the ball at the moment, trying to force out the high-line again from Wellington.
There’ll be one minute of injury time here.
Melbourne Victory vs Wellington Phoenix: A-League live scores, blog
43’—PHOENIX IN POSSESSION, VICTORY COUNTERATTACK QUICKLY
Thompson switches well from left to right. Plays it back to Geria who gets it through to Milligan. He cuts it back to Traore at the top of the box—shoots with the outside of his boot but it’s out for a goal-kick.
Both teams looking dangerous every time they touch the ball. High defensive lines not helping.
Melbourne Victory vs Wellington Phoenix: A-League live scores, blog
40’—HUYSEGEMS SCORES, BUT HE’S OFFSIDE! HUGE LET-OFF!
Traore appears fouled on the right flank but there’s no whistle. Ball is played centrally to Huysegems who puts it in the back of the net, but he’s called back for offside. Stunning football at the moment!
Great call assistant ref. #standardneverbeenbetter
— Adam Peacock (@adampeacock3) November 4, 2013
Victory definitely rattled at the moment; Nichols subbed off as well with that injury.
41’ Nichols OFF, Finkler ON – Nichols received treatment earlier in the half and doesn’t look like he’s able to continue #MVCvWEL 3-1
— Melbourne Victory (@gomvfc) November 4, 2013
Melbourne Victory vs Wellington Phoenix: A-League live scores, blog
38’—MUSCAT PLAYS THROUGH HUYSEGEMS BUT OFFSIDE
Dangerous there for the Victory, and a lucky escape. Muscat with a nice run through the middle, plays through Huysegems in behind Melbourne’s high defensive-line but it’s called back for offside!
Melbourne Victory vs Wellington Phoenix: A-League live scores, blog
37’—GOAL!! BROCKIE SCORES!! VICTORY NOW LEAD 3-1!!!
Chaotic defending there from Melbourne. In control, they turn it over at left-back and a quick cross from Hernandez finds Brockie in an acre of space! He breaks through on goal, composes and makes no mistake!
Very busy first half, Victory still lead this one 3-1.
Absolutely nobody near Brockie, glides into the box and finishes with aplomb. 3-1 now #MVCvWEL
— The Football Sack (@TheFootballSack) November 4, 2013
Melbourne Victory vs Wellington Phoenix: A-League live scores, blog
35’—VICTORY IN POSSESSION, SWITCHING FROM LEFT TO RIGHT
Nice spell of possession from the home team here, switching from one side to the other.
Phoenix dropping everyone back behind the ball to try and stop the bleeding.
Melbourne Victory vs Wellington Phoenix: A-League live scores, blog
33’—THOMPSON AGAIN IN BEHIND DEFENSE, BUT CAN’T CONTROL
Unbelievable how many times Melbourne are getting in behind this high-line from Wellington!
This time it’s Thompson who’s played through, but he can’t control it and the chance disappears. Melbourne win the ball back, Thompson breaks down the right flank and wins a corner.
Melbourne Victory vs Wellington Phoenix: A-League live scores, blog
31’—GOAL!!! TROISI SCORES!! VICTORY LEAD 3-0!!!
High line again caught out from the Phoenix. Troisi gets in behind, one-on-one with Moss and delivers a wonderful chip over Moss to get the Victory’s third of the night in just half an hour of this game!!
Wellington with some chaotic defending, Muscat off to a dream start!!
Troisi just glided past Riera with ease there, almost as if he was a backpacking paramedic rather than a professional player #MVCvWEL
— Iain Strachan (@IainStrachan) November 4, 2013
31': And it's three! James Troisi with a classy chip. Do you think Kevin Muscat's happy? #MVCvWEL pic.twitter.com/ROnS4ZSk4r
— FOX SPORTS Football (@FOXFootballLive) November 4, 2013
Melbourne Victory vs Wellington Phoenix: A-League live scores, blog
30’—COUNTERATTACK FOR VICTORY, CHANCE, DENIED.
Phoenix trying to build in attack, but turned over and the Victory counterattack!
Troisi running through the middle, plays in Nichols but he tries to cross it back and the Phoenix can clear! Oh dear—had Thompson screaming down the right hand side but didn’t see him at all!
That could easily have been 3-0 for the home team, Wellington look stunned.
Melbourne Victory vs Wellington Phoenix: A-League live scores, blog
28—BOTH TEAMS SWAPPING POSSESSION, LOTS OF TURNOVERS
Phoenix try to break down the left but Melbourne snuff it out and look to break down the left again. Wellington win it back and will build from the back. Both teams turning it over a lot at the moment!
Victory still lead 2-0.
Melbourne Victory vs Wellington Phoenix: A-League live scores, blog
25’—RIERA WITH A STRONG RUN, FOULED, CHANCE FOR PHOENIX
Nice run from Riera wins a foul and yellow card from Geria. Free kick is taken by Hernadez, 20 out on a slight angle to the left but his shot is well over the bar and doesn’t trouble the defense at all.
Melbourne Victory vs Wellington Phoenix: A-League live scores, blog
24’—VICTORY IN POSSESSION IN OWN HALF, CHANCE DOWN LEFT AGAIN!
Melbourne looking to play out of their own half, and AGAIN find space down left flank. Thompson gets away from his marker and streaks down the left. Crosses, but it’s cleared in the box by Wellington.
Victory cutting open Wellington down that flank so far.
Melbourne Victory vs Wellington Phoenix: A-League live scores, blog
21’—GOAL: TROISI!!! MELBOURNE VICTORY LEAD 2-0!!
Durante with a shocking mistake!! Ball is dangerously played across field by Phoenix, Durante tries to head back to Moss but doesn’t get any power on it and Moss is easily beaten in the one-on-one situation! Very similar to Chelsea’s goal against Manchester City the other week! Absolute howler!
Phoenix look stunned, home crowd definitely getting behind the local lads here!
A header meant for Moss, from Andrew Durante was easily picked up for Troisi’s third of the season #MVCvWEL 2-0
— Melbourne Victory (@gomvfc) November 4, 2013
Melbourne Victory vs Wellington Phoenix: A-League live scores, blog
20’—THOMPSON THROUGH ON GOAL, PULLED BACK FOR FOUL
Lovely ball finds Troisi who gets between the midfield and defense, he plays through Thompson on a through ball. He’s away, but pulled back for a foul on half-way—didn’t look to be anything in that at all!
Melbourne Victory vs Wellington Phoenix: A-League live scores, blog
58’—Hernandez with a chance, Milligan clears at the last minute!
Brockie gets through down the left flank after a charged-down clearance. He crosses it into the middle for Hernandez who is seemingly through on goal, but Milligan clears at the last second inside the six-yard box to save the day! Phoenix get a chance with a second cross, but the effort is over the bar and out for a goal-kick.
Melbourne Victory vs Wellington Phoenix: A-League live scores, blog